Re-branding!!

I have some really big news! I’m moving my blog!! So my lack of posting hasn’t been because I haven’t been baking, I’ve been working on moving my blog. You can now find me at www.bittybitebakery.com Go and check out my new post there!

Also, big news…I’m now on Facebook! Yes, you can now hop over and follow me on FB here. And don’t forget to follow me on Pinterest! Don’t forget to subscribe to my new blog!!

I’m really excited about this and hope you will join me on this great adventure! I will no longer be posting on this blog, but you definitely know where you can find me!

Jessica the Baker

Irish Soda Bread

This is absolutely the BEST Irish soda bread! If you want to feel Irish on St. Patrick’s Day, you should definitely give this bread a try!

4

As I type this I’m listening to Irish music and wishing I could eat out of this Irish soda bread right now! Seriously, I have a weakness for Irish soda bread, it’s just SO GOOD!!!

5

Our local grocery store sells Irish soda bread, and they usually have a little basket out for people to sample the bread. You’re lucky if you still find some in there because it usually goes pretty fast! Whenever we do find the basket full, it’s like we find gold and we’ll grab as many as we can without looking too rude. 😀 Before I tasted Irish soda bread for the first time, I kept hearing everyone talk about it and wasn’t sure what all the fuss was about. I mean, what was so special about a crusty bread called a “soda bread”? Is it just because it’s from Ireland and people want to feel Irish on St. Patrick’s Day?

PicMonkey Collage 1

To my amazement I found out that there really is something so deliciously amazing about this bread. The buttermilk and baking soda in the bread make a chemical reaction that causes it to rise, and it gives it that wonderful, almost biscuit-like texture. Not to mention that it’s slightly sweet and it has raisins, and that raw sugar on top becomes crunchy when it’s baked (which is the best part!). Plus it’s SO easy to make!

PicMonkey Collage 2

 St. Patrick’s Day is tomorrow and I usually don’t make a big deal to celebrate it. BUT, if you give me some delicious Shepherd’s Pie, and this amazing Irish soda bread, then I might change my mind. 🙂 Of course I don’t want my little sisters to pinch me so I might try to wear something green if I remember…

6

I could eat it every.single.day it’s that delicious. And I’m not even Irish! Or maybe I am and I don’t know? 🙂 I do love Ireland and I would love to visit that beautiful country one day. What could be better than eating a slice of this bread, slathered with Irish butter (oh yeah!) and some good quality jam? Now that’s how I like to celebrate my St. Patrick’s Day.

Irish Soda Bread collage 2

Irish Soda Bread

Ingredients:

4 cups flour
1/2 cup white sugar
3 tsp. baking powder
1 tsp. baking soda
1/2 tsp. salt
1/2 stick butter (4 Tbsp)
2 cups raisins
1 large egg, lightly beaten
1 3/4 cups buttermilk
Raw sugar for the top

Directions

Preheat oven to 375 degrees F. Grease a baking sheet and set aside.

In a large bowl combine all the dry ingredients. Add the butter and cut in with a pastry blender until mixture is crumbly. Mix in the raisins. Fold in egg and buttermilk into dry ingredients until blended. Turn dough onto floured surface and pull the dough together, kneading gently until it comes together. DO NOT OVER MIX! You can add a little more flour if dough is too wet. Divide the dough in half and shape into rounds. Place both balls of dough on your prepared baking sheet. Cut crosses on top, 1/2 in. deep. Lightly brush with some milk and sprinkle the whole surface with raw sugar. Bake for 35-40 minutes, or until golden brown.

Enjoy! 

Jessica the Baker

Creamy Lemon Pie for National PI Day

What better way to celebrate this epic Pi day than with a  deliciously creamy lemon pie? It’s bursting with fresh lemon flavor!

IMG_0470

 I seriously didn’t plan on posting two lemon desserts in a row, I promise! But happy Pi Day everyone! Now this is not to be confused with Pie day which is on January 24th. We already celebrated that here.

IMG_0471

 Pi day is always celebrated on March 14th. Now if you’re a math nerd, you will know that this Pi day is extra special since it’s 3.14.15. I actually had to look it up to see that the math Pi is 3.14 and 15 follows right after. Pretty cool eh? We’re actually living through a day that will make history…or at least that’s how I like to think about it. 🙂 Sorry, one of my favorite subjects in school was history.

lemon collage

 Do not let this day pass without celebrating with edible pie! I mean just think, you will never see the date 3.14.15 again!! So take advantage of it, and treat yourself with something special. Preferably pie since we are celebrating Pi day. And preferably I would love it if you would give this luscious, creamy, chock-full-of-lemon flavor pie a try! Wow, that rhymed! 🙂

IMG_0478 2

 Since we added lemon zest to it, there will be no denying that this is a lemon pie as soon as you take your first yummy bite. Also adding some sweetened condensed milk gives this a wonderfully creamy texture, almost like a cheesecake. Not to mention that the shortbread crust kind of becomes like a flaky pie crust that you make for regular pies.

Creamy Lemon Pie

 So let’s celebrate Pi Day with yummy pies, and if you’re feeling up to it, you can have a math day on 3.14.15. 😉 Today’s not a day to count calories though…hehe (get it? count, math…I know I’m crazy) 🙂

 Creamy Lemon Pie

Ingredients:

CRUST

2 cups flour
1/2 cup powdered sugar
1 cup (2 sticks) butter, softened

FILLING

1 can (14 oz.) sweetened condensed milk
4 large eggs
2/3 cups lemon juice
1 Tbsp. flour
1 tsp. baking powder
1/8 tsp. salt
1 Tbsp. grated lemon zest
sifted powdered sugar (optional)

DIRECTIONS

Preheat oven to 350 degrees.

For the crust. Combine flour, and powdered sugar in a medium bowl. Cut in butter with pastry blender or 2 knives until mixture is crumbly. Press lightly onto bottom and halfway up sides of ungreased 10 in. deep dish pie pan. Bake for 20 min.

For the filling. Beat sweetened condensed milk and eggs in large mixer bowl until fluffy. Beat in lemon juice, flour, baking powder, salt, and lemon zest just until blended. Pour over baked crust. Bake for another 20-25 min. or until filling is set and crust is golden brown. Cool in pan on wire rack. Sprinkle with powdered sugar or top with whipped cream. Slice and enjoy!

Jessica the Baker

Lemon Buttermilk Cake

This lemon buttermilk cake is deliciously flavorful, but it’s also super moist! If you love a lemons, then this is a dessert for you! 

Lance DOG!! 009

Someone blessed us with a bag of lemons (Thank You!). I always get excited when I see a bag full of lemons. You know the saying, “when life gives you lemons, make lemonade”. But I say when life gives you lemons don’t just make lemonade, make some lemon cake. And don’t just stop there, turn all the possible desserts into lemon desserts! 🙂

Lance DOG!! 011

I love, love, love, lemon desserts!! #lemonlover

As you can see, I already made lemon barlemon cupcakesblueberry lemon yogurt loaf, and of course I made lemonade, but not just any lemonade, raspberry lemonade. And I’m still coming up with other lemon dessert ideas. Stay tuned!

Did you ever Google the benefits of lemons? My goodness, they’re an entire health pill! Of course they probably lose their health benefits in one of these cakes, but they definitely don’t lose their amazing flavor! Surprisingly I used to dislike lemon desserts, and I think it was mainly because of the artificial flavor that some of the desserts had (I think it was lemon extract or something). For this recipe I substituted the lemon extract with vanilla extract.

The lemon definitely pops in this cake since you have it both in the cake and in the icing. But it’s a fresh kind of taste. I almost can’t even describe it, but you can tell it’s a natural kind of lemon taste. I hope I make sense. 🙂

PicMonkey Collage lemon

February has zoomed past us and now March is here! That means we’re 18 days away from the first day of Spring, it means daylight saving time begins and the days will be longer, and it means that we’re getting closer to warmer weather!! I love Spring and Summer the most. And I think this lemon buttermilk cake is the perfect dessert for a spring party or get together. Because of the buttermilk, the cake is super moist which makes is that much more delicious!

I hope you give this recipe a try. My family and I really loved it!

Lemon Buttermilk Cake

Recipe from here

Ingredients:

Cake
1 1/4 cups all-purpose flour
3/4 cup granulated sugar
2 teaspoons baking powder
pinch salt, optional and to taste
1 tablespoon lemon zest
1 large egg
1/2 cup buttermilk
1/3 cup sour cream, lite is okay (plain Greek yogurt may be substituted)
1/4 cup lemon juice
3 tablespoons canola or vegetable oil
2 teaspoons lemon extract (vanilla extract may be substituted)

Glaze
2 cups confectioners’ sugar
about 1/3 cup lemon juice, or as necessary for consistency
about 1 tablespoon lemon zest, or to taste

Directions:

  1. Preheat oven to 350F. Line an 8-by-8-inch baking pan with aluminum foil, spray with cooking spray; set aside.
  2. Cake – In a large bowl, whisk together flour, granulated sugar, baking powder, optional salt.
  3. Whisk in zemon zest; set aside.
  4. In a separate small bowl, whisk together the egg, buttermilk, sour cream, lemon juice, oil, and lemon extract.
  5. Add the wet mixture to the dry, mixing lightly with a spoon or folding with a spatula until just combined. Small lumps will be present, don’t overmix or try to stir them smooth.
  6. Turn batter out into prepared pan and bake for about 28 to 31 minutes, or until center is set and not jiggly, and a toothpick inserted in the center comes out clean or with a few moist crumbs, but no batter.
  7. Place pan on a wire rack and allow cake to cool. While cake cools, make the glaze.
  8. Glaze – In a medium bowl, add 2 cup confectioners’ sugar, 1/3 cup lemon juice, and whisk until smooth. As necessary, add additional lemon juice (or sugar) to reach desired glaze consistency. I used slightly over 1/3 cup lemon juice. Glaze should be easily pourable.
  9. Evenly pour glaze over cake (doesn’t have to be fully cooled), smoothing it lightly with a spatula if necessary, but glaze will likely just slide into place.
  10. Allow cake to cool in pan uncovered for at least 1 hour (or overnight and cover with a sheet of foil) before slicing and serving so glaze can set up. Cake will keep airtight at room temperature for up to 5 days, or in the freezer for up to 6 months.

Enjoy! 

Jessica the Baker

Chocolate Chip Caramel Walnut Banana Bread

Chocolate chip caramel walnut banana bread is pure decadence! Why eat plain banana bread when you can dress it with chocolate chips, walnuts, and caramel sauce!?!  bigger So I decided to share this with you sooner rather than later because, well because this was SO good and it’s worth sharing right now!

Lance DOG!! 897

It’s been too long since I last shared my banana bread recipe, and since then I’ve made some adjustments and changed the recipe a bit. And adding caramel sauce, chocolate chips and walnuts made it extra amazing!

Lance DOG!! 902

Lance DOG!! 907

Let me tell you about the people I bake for (a.k.a my family). For example for this banana bread, some wanted chocolate chips and walnuts but no caramel sauce, others wanted walnuts and caramel sauce without the chocolate chips, still others wanted all three together. And of course I’m such a good daughter/sister and I want to please everyone with my baking.  

So I made two loaves and then ended up putting some caramel sauce on the one that had chocolate chips and walnuts as well. It is SO good! Very, very rich though so I’m not saying that you should make your banana bread like this all the time. But sometimes you just need a decadent dessert. The chocolate chips taste amazing with the banana, and caramel sauce always makes everything better. Personally I love the combination of chocolate and banana as you can see here. As for the walnuts, I always add them in banana bread because I’m pretty much nuts 4 nuts. 🙂 That extra crunch makes it taste that much more amazing. You can totally leave them out if you don’t prefer them, I won’t judge. 🙂

finally

As you can see, ever since I made homemade caramel sauce for the first time here, I’m trying to incorporate it in everything. I LOVE caramel sauce, I can eat it with a spoon right out of the sauce pan. Talking from personal experience here. 🙂

Please, please give this banana bread a try! It is super moist and delicious!

Chocolate Chip Caramel Walnut Banana Bread

Ingredients:

2 cups flour
1/4 tsp. salt
1 tsp. baking soda + a few drops of lemon juice
1 cup sugar
1/4 cup butter, softened
1/4 cup oil
2 eggs (beaten)
1 tsp. vanilla
3 over ripe bananas, mashed
1/4 tsp. cinnamon
1/2 cup chopped walnuts 1 cup (or more if you prefer) chocolate chips

Caramel Sauce:

1 cup granulated sugar
1/2 cup water
3/4 cup heavy cream, warmed slightly, either in a small saucepan or microwave
2 Tbsp. unsalted butter at room temperature
1/4 tsp. salt
1/2 tsp. vanilla extract

Directions:

Preheat your oven to 350 degrees. In a small bowl mix together flour, salt, and baking soda. Put a few drops of lemon juice over the baking soda and watch it fizz up. Sift all the dry ingredients into another bowl. Cream together the butter, oil, and sugar in a large bowl. Add the eggs, vanilla, bananas, and cinnamon. Mix until combined. Fold in the dry ingredients into the wet. Blend the chopped walnuts and chocolate chips in the batter.  Scrape into a greased loaf pan and bake for about 50-60 minutes or until toothpick inserted into the center comes out clean. You may find that you may need to lower your oven temperature after a while and/or cover your loaf with aluminum foil to prevent the top from burning and to let the inside bake thoroughly. While the banana bread is baking, make the caramel sauce. In a large non stick sauce pan combine the sugar and water, cook over medium low heat until the sugar dissolves without stirring ever! Just swirl the pan around. Once the sugar has dissolved, turn the heat to medium high and let it bubble away until it turns a deep amber color, about 8 to 10 minutes. Turn the heat down to low at this point and add the warm heavy cream slowly. Be careful because it will bubble vigorously. Keep whisking until everything is combined and turn the heat off. Add the butter, salt and vanilla and whisk in until the butter melts. Set aside to cool completely. Once the banana bread has cooled, drizzle with your cooled caramel sauce.

Slice and enjoy! 

Picture1

Caramel Popcorn

Caramel popcorn is the perfect snack to treat your family and friends. It is easy to make and will disappear in minutes! 

A fire! Cats and rainbow milk with lois b_day 647

Has anyone ever tried the Chicago Mix popcorn from Costco? It’s cheddar cheese and caramel popcorn mixed together. It’s absolutely TO DIE FOR!!! Seriously, I cannot stop eating that thing, and I think it’s good that we don’t buy it very often. 🙂

A fire! Cats and rainbow milk with lois b_day 650

When we were little, our uncle would give us one of those 3-way popcorn tins for Christmas. I would always get so excited for those, not only because I love popcorn, but as good as the butter and cheddar ones were, I would always go for the caramel popcorn most. It was my favorite! Of course since I was sharing with my sisters, it wasn’t fare for me to eat all the caramel corn by myself, so I had to eat the other flavors equally.

A fire! Cats and rainbow milk with lois b_day 651

As much as I love that store-bought popcorn, it never hurts to try making some at home. And I most definitely do not mean the  microwave kind, but the one you actually do in a pot on the stove. It’s so much more healthier! I only tried caramel popcorn, and I even made the caramel sauce myself. I should have done a double batch of caramel sauce because I like my popcorn with a generous coating of caramel on, but I didn’t have enough heavy cream.

A fire! Cats and rainbow milk with lois b_day 652

Still, it was SO delicious! We didn’t even wait for the caramel sauce to set, and for about 5 min.  our family was gathered around the popcorn munching away until we pretty much ate the whole thing. 🙂

A fire! Cats and rainbow milk with lois b_day 653

This is a perfect snack to serve at a party, you’ll see it devoured in no time! Plus, you can make more than one batch to have enough to feed an army. Your gonna need it. 🙂

A fire! Cats and rainbow milk with lois b_day 655

PicMonkey Collage popcorn

So please try it, and if you did, comment below and tell me how you like it. I mean, I have yet to find someone who doesn’t like caramel popcorn.

Homemade Caramel Popcorn

popcorn recipe adapted from here
c
aramel sauce recipe from here

Ingredients:

1/4 cup vegetable oil
1/2 cup popcorn kernels
1 tsp. salt

Caramel Sauce:

1 cup granulated sugar
1/2 cup water
3/4 cup heavy cream, warmed slightly, either in a small saucepan or microwave
2 Tbsp. unsalted butter at room temperature
1/4 tsp. salt
1/2 tsp. vanilla extract

Directions

Line your counter or a baking sheet with parchment paper. This is where you’ll lay the popcorn to cool after it is done cooking. Also set aside a piece of parchment paper to fit between the opening of the pot and the lid. This will keep your lid clean while the popcorn is cooking for easy clean up.

Add the oil to a large, non stick pot with a lid. Add in a few popcorn kernels, and turn the heat to medium high. As soon as the first kernels pop, you know the oil is hot enough.

Add in the popcorn kernels. Put the lid on the pot, with a piece of parchment paper in between. Every 10 seconds, pick up the pot and shake it really hard for 3 seconds, then return it to the heat for another 10 seconds. Repeat this over and over until the popping noises slow. Remove the pot from the heat and pour the popcorn on the parchment paper. The whole cooking time is about 3 minutes.

Sprinkle the warm popcorn with salt and allow to cool for a few minutes. Meanwhile make the caramel sauce.

In a large non stick sauce pan combine the sugar and water, cook over medium low heat until the sugar dissolves without stirring ever! Just swirl the pan around. Once the sugar has dissolved, turn the heat to medium high and let it bubble away until it turns a deep amber color, about 8 to 10 minutes. Turn the heat down to low at this point and add the warm heavy cream slowly. Be careful because it will bubble vigorously. Keep whisking until everything is combined and turn the heat off. Add the butter, salt and vanilla and whisk in until the butter melts. Set aside to cool completely.

Once the caramel sauce has cooled, drizzle it all over the popcorn as evenly as possible tossing it with your hands so that the caramel sauce coats all the popcorn. Let it set for about 5 to 10 minutes.

Enjoy! 

Picture1

Raspberry Swirl Cheesecake

Beautiful and decadent, this raspberry swirl cheesecake is perfect for Valentine’s Day this weekend!

A fire! Cats and rainbow milk with lois b_day 040

I’m actually not into Valentine’s day, but here’s a great dessert that you can make for your loved ones this weekend. It is amazingly delicious, and sure to impress anyone!

PicMonkey Collage r1

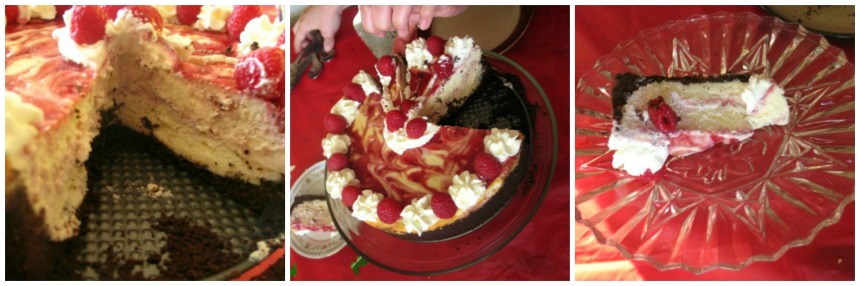
I made my very first baked cheesecake ever, and I survived!!! I made this no-bake chocolate cheesecake before, but it was a no-bake recipe. I know most people have cheesecake-making phobia thinking it’s such a complicated recipe since you have to bake it in a water bath, let it cool with the oven partially open, yada, yada, yada. Well I’m happy to announce that this recipe is actually quite easy!

PicMonkey Collage r2

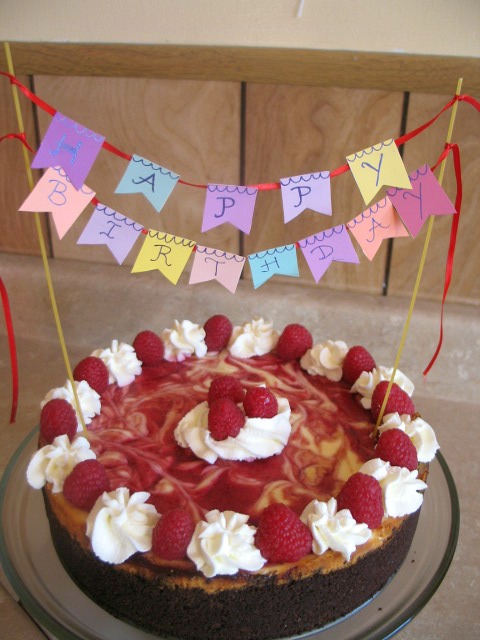
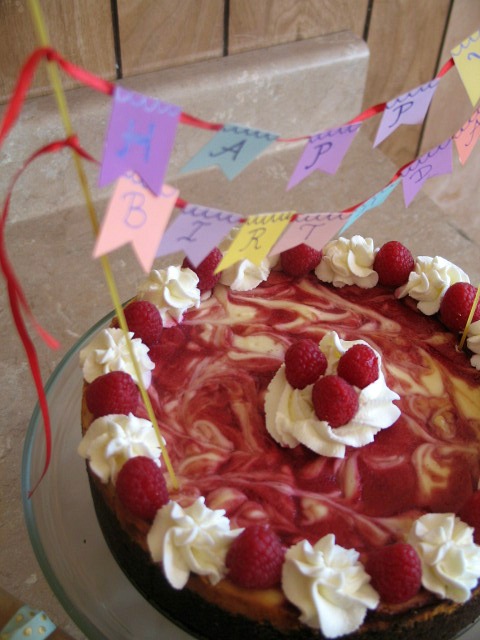
As you can see, there are no major cracks on top either! I think there were a few very small ones, but since the raspberry was swirled on top you couldn’t even tell, especially after I garnished it.

PicMonkey Collage r3

I’m very happy with how it turned out! And the taste was just as delicious. It’s very smooth and creamy, and together with the raspberries…*sigh*

A fire! Cats and rainbow milk with lois b_day 064

For about 4 years now we’ve been getting the Costco cookbook for free every Black Friday. They have lots of great recipes, and every now and then we like to try one out. My sister saw this recipe in one of the cookbooks.

A fire! Cats and rainbow milk with lois b_day 079

So like I said, this is the first time I tried a baked cheesecake which is very ridiculous because I bought some springform pans a loooong time ago. I baked lots of things in them, but never a cheesecake.

A fire! Cats and rainbow milk with lois b_day 073

Then one day my sister put her foot down and demanded a cheesecake for her birthday (well not really demanded, but she really wanted it). 🙂 So what could I do? I happily obliged and jumped to the opportunity to try my first cheesecake.

A fire! Cats and rainbow milk with lois b_day 081

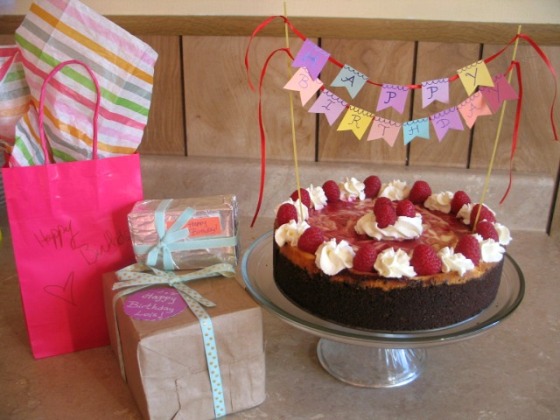
I’m so glad it didn’t turn out a flop because that would’ve ruined her birthday, and nobody wants a bad cake for their birthday.

A fire! Cats and rainbow milk with lois b_day 098

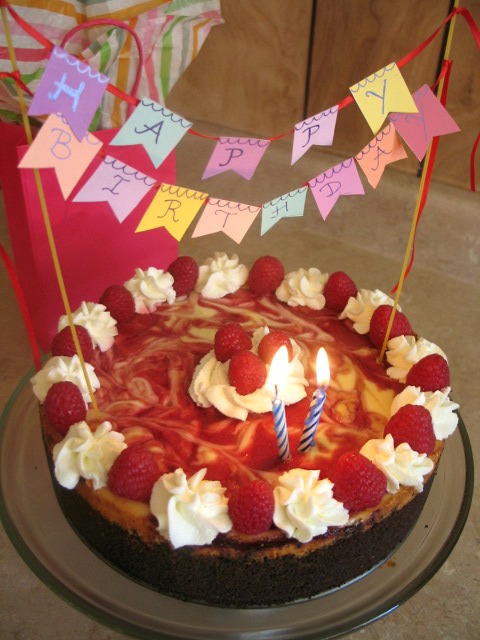
My other sister made this darling little banner to put on top of the cheesecake. I think it makes it look very festive! “But wait” you ask, didn’t your sister just have a birthday with the Neapolitan Cupcakes? Yes, well you see, I have many sisters, and most of us have birthdays in the same month. But that’s okay with me because that means more cake! 🙂

PicMonkey Collage r4

So as you prepare for Valentine’s Day this weekend, think outside the chocolate box (no pun intended) and make some cheesecake! The color alone should convince you to do it! 🙂

Raspberry Swirl Cheesecake

Recipe from Fabulous Food the Costco Way

Ingredients:

Crust
3 cups chocolate wafer cookies, crushed (I used chocolate graham crackers)
9 Tbsp. unsalted melted butter

Filling and Topping
2 cups raspberries, divided
2 tsp. vanilla extract, divided
1 cup + 2 tsp. sugar
3 8-ounce packages cream cheese, room temperature
3 large eggs
1/2 cup sour cream
Mint leaves, for garnish (optional)

Directions:

Preheat oven to 350 degrees F.

Crust: Combine crumbs and butter. Press into and up sides of 9-inch nonstick springform pan. Bake 12 min. Cool. Reduce temperature to 300 degrees F.

Filling and Topping: Puree 1 cup raspberries, straining into a small bowl. Discard seeds. Stir in 1 tsp. vanilla and 2 tsp. sugar; set aside.

Beat together cream cheese and remaining sugar on low until blended. Add remaining vanilla. Add eggs one at a time. Add sour cream. Mix until blended. Spoon half of batter into the crust. Drop half of raspberry puree by teaspoons into batter. Swirl. Repeat with remaining batter and puree. Bake 50 minutes, until edges are just set and center jiggles slightly. Turn oven off and partly open oven door. Cool cake in oven 1 hour. Remove from oven and cool completely. Chill in refrigerator overnight. Garnish with remaining raspberries, whipped cream, and mint leaves.

Enjoy!

Jessica the Baker

Chocolate Pudding & Apricot Jam Tartlets

Darling little tartlets filled with apricot jam and chocolate pudding. They’re sure to impress anyone, yet they’re so simple to make! 

#cont. of #cool pics 206

I really love this dough! I used it for these apple tartlets and I just had to try it with different fillings.

#cont. of #cool pics 207

This is one of those recipes that you can whip together if you’re in a pinch. I mean, you can make the dough way ahead of time and store in the fridge or freezer, and whenever you feel like it you can pull it out and have these tartlets done in minutes.

#cont. of #cool pics 209

I love these with apricot jam, and I want to try them with strawberry jam next time.

PicMonkey

I added some walnuts on top for some extra crunch and flavor. So delicious! I think I like the ones with the walnuts better, but the plain ones were good too. I know I’m probably repeating myself, but the tartlet shells are so soft they almost melt in your mouth!

#coolpics #beckysbirthday 632

And because I had some chocolate on hand (and chocolate makes everything better), I filled some with homemade chocolate pudding.

#coolpics #beckysbirthday 643

As you probably already know, I like to make things from scratch as much as possible. I find that many times the homemade version tastes better than the store bought ones, and this pudding is no exception! These are decadent with chocolate pudding!

PicMonkey Collage 5

Now I can’t decide if I like the chocolate pudding tartlets better than the ones with jam…#decisionsdecisions

#coolpics #beckysbirthday 646

They’re both delicious let me tell you that. The chocolate ones are a little fancier, while jam ones are a bit more casual. It doesn’t matter what you fill these with, you’re sure to have a delicious treat to give to someone (or eat yourself…why not?).

 Apricot Jam & Chocolate Pudding Tartlets

Ingredients:

For the crust recipe go here

For the Chocolate pudding:

6 large egg yolks
9 tablespoons granulated white sugar
6 tablespoons arrowroot powder (it can also be substituted with corn starch)
1/8 teaspoon salt
3 cup whole (full fat) milk
1 1/2 tablespoon  unsalted butter, at room temperature
2 teaspoon pure vanilla extract
4 oz. melted dark chocolate

Any Jam of your choice
Chopped walnuts or pecans (optional)

Directions:

 In a medium-sized heatproof bowl, whisk the egg yolks with the sugar. Add the arrowroot powder and salt and mix until you have a smooth paste. Meanwhile, in a saucepan bring the milk just to boiling (the milk starts to foam up.) Remove from heat and slowly pour the milk into the egg mixture, whisking constantly to prevent the eggs from curdling (pour through strainer if necessary). Pour the egg mixture back into a medium saucepan and cook over medium heat until boiling, whisking constantly. When it boils, keep whisking the mixture for another 30 – 60 seconds or until it becomes thick. Remove from heat and immediately whisk in the butter and vanilla extract, and slowly pour in the melted chocolate, mixing as you pour. Pour the pudding into a clean bowl and cover the surface with plastic wrap to prevent a crust from forming. Cool to room temperature and then refrigerate until firm.

On a floured surface roll out your dough about 1/8 in. thick. Cut out 4 in. round shapes with a cookie cutter and place them in a muffin pan. Bake at 350 degrees for 10-15 minutes or until tartlet shells are golden brown. Let them cool on a wire rack and then spoon about 2 tbsp. of chocolate pudding. Let them set in the fridge for about an hour, and top with either strawberries or raspberries.

To make jam tartlets, spoon about 1-2 Tbsp. of jam in each uncooked pie shell. Sprinkle chopped walnuts or pecans on top (optional). Bake at 350 degrees for about 10-15 min. or until deep golden brown.

Enjoy!

Jessica the Baker

Crepes

Happy Monday and happy national Crepe day! 

PicMonkey Collage 1

Let’s pretend to be French for a little bit and make some Crepes. 🙂

I find it interesting that a dessert that is SO easy to make is considered so sophisticated. But that makes our job as bakers a lot easier because we can quickly impress someone with an easy peasy recipe. People will say “Wow!” and only you and I will know the secret and chuckle silently. 🙂

IMG_0763

These can be eaten for breakfast, dessert, snack, or anytime you feel like it. For us, it’s one of those desserts that we can quickly whip up if we feel like eating something sweet, or we have unexpected guests, because most likely we always have the ingredients on hand. I love those kinds of recipes!

PicMonkey Collage 2

Crepes are so versatile you would not believe it! Just look on Pinterest and see how many ways you can eat them. I’d like to do a Crepe cake once, we’ll see what flavor I’ll choose. Here I used apricot jam, but whatever jam you have on hand will make your Crepes very delicious. It may sound weird, but sometimes I like them with peanut butter along with jam.

IMG_0772

If you’re feeling fancy, whipped cream and fruit not only tastes delicious but it’ll look very pretty. I didn’t have any on hand, so I just used jam.

PicMonkey Collage 3

Now, if you’re anything like my family, you’ll always have to make about 2-3 batches because they disappear very quickly! 🙂

IMG_0775

I also saw chocolate crepes on Pinterest. Imagine the possibilities once you have a good basic Crepe recipe!
(which you do now…*ahem* 😉 )

IMG_0777

So, cheer up your Monday with some delicious Crepes for national Crepe day! It’s February after all (how is that possible?!) which means we’re 1 month closer to Spring and Summer!

Easy Crepes

Ingredients:

1 egg
1 cup milk
1 Tbsp. softened butter or oil
3 1/2 Tbsp. sugar
1 Tbsp. vanilla
1 tsp. rum essence (optional)
1 pinch salt
3/4 to 1 cup flour

Filling:
Apricot or strawberry jam. Or any jam of your choosing. Top with whipped cream and/or fresh fruit (e.g. strawberries, raspberries)

Directions:

In a large bowl mix all ingredients in the order listed. It will be make a watery batter, something of the consistency of melted vanilla ice cream. Put one or two drops of oil in a frying pan and preheat on medium high heat for a few minutes. Quickly pour about 1/2 cup of batter in the hot frying pan. While you do this, hold the panhandle and do rotating motions with the pan, so the batter covers the whole surface of the pan. Let the crepe fry for about 30 sec. to 1 min. Then gently flip over with a metal spatula, and fry on the other side until equally golden brown. Repeat process until all batter is used up. Spread a thin coat of jam on one surface of the crepe all the way near the edges. Then roll up the crepe, and top with whipped cream and/or strawberries.

Enjoy! 

Jessica the Baker

Neapolitan Cupcakes

Have I got a treat for you! We all know everything is better in the form of a cupcake, so Neapolitan cupcakes are here!!

IMG_0533

So, who’s excited for the Super Bowl this weekend? I’m not into football, but I have friends who are crazy about it, and I know some of my cousins are excitedly rooting for the Sea Hawks. Are you making anything special? Wings, Sloppy Joes, Chili, or Pizza? I love Chili and we might have some this Sunday even though we won’t watch the games. 🙂

PicMonkey Collage

I made these cupcakes for one of my sisters. She saw them pinned on my Pinterest (which you should definitely follow btw) and wanted me to make them for her birthday instead of cake. I actually also made a cake for her without her knowing, and she was very surprised and excited.

2

We have a local burger place here that sells chocolate, vanilla, and strawberry milkshake, and you can also order Neapolitan flavor. It is one of the best things ever because you can taste all the different flavors at once. These cupcakes are also very delicious and moist. As you can see, I think I added a little too much chocolate batter because it’s not exactly half and half on the inside. Oh well, I’ll do better next time. 🙂

IMG_0532

They’re very pretty though! Something you might consider doing this Sunday to impress everyone…(maybe?) 🙂

PicMonkey Collage 3

These cupcakes together with the cake made for a very happy birthday…or a very happy sweet tooth? Both I guess. 🙂

Click HERE to get the recipe!

Jessica the Baker